A Quick Git Rebase Tutorial

If there’s one thing you should know about me (technically), it’s that I love a good rebase. I loathe merge commits and a nice, linear commit history brings me joy. Since I am somehow leading my current team (who decided that was a good idea???), we are using rebase pretty heavily! I’ve found that people often get flustered with merge conflicts and wanted to do a quick tutorial covering merge conflicts and a basic rebase. Let me know what you think!

My Git Workflow

One thing I’ve learned as a developer is that everyone has a slightly different git workflow. Mine is pretty simple, rarely uses anything beyond the basics (other than rebase), so, if you are an early career developer, consider trying it on for size. Let’s get started!

I’ve just grabbed a ticket, so I’m ready to get started. First things first: I need to create a new branch off main.

git checkout -b my-awesome-branch

Now that I’m on my branch, I can start making changes. I will make one small change and create a new file. Now I’m ready to commit! But first, I must validate that the changes I’m committing are precisely what I want. You might think, “Jennifer, I just made these changes; why do I need to recheck it?” While it might seem silly, you will be surprised by the changes creeping into your commits if you aren’t careful. One really common one is dependency updates. So first: we will do a git status and a git diff.

command prompt showing the results of git status -s

You’ll notice that I didn’t just do git status but git status -s. The -s is for “short” and I prefer that because it gives me all the information I need in a nice compact manner. The M says that a file is modified and the ? means that it’s a new, untracked file. Next, I want to do git diff which will pop up a window (by default using vim) that looks something like this:

output of git diff

It shows that I added one new line in README.md. You’ll notice that nothing will show up for the untracked file! Now that I’m confident that my changes are what I want them to be, I’m going to do git add -A and then run git status -s again (which I have mapped to git s).

output of git add -A and git s

Time for a commit! If I have a longer commit message that I want to write, I will do a full git commit. More often, I will just use git commit -m to do it all in one line.

output from `git commit -m "extremely necessary hello_world script"`

Now, time to push it up.

output from git push

That might be all. However, like many developers, I often realize I have made a mistake. I like to pretend my mistakes never happened! Some people will just make a brand new commit with a message like “fixing typo”. Me? I pretend my typos never happened by making my changes, adding the file, then doing git commit —-amend.

git status -s, git diff, git add, git status -s, and git commit --amend

There are a couple of spots in this where I couldn’t get it all in one. So here’s the git diff that happened at the 9:34 timestamp:

git diff

Clearly I realized that I didn’t actually want “World” but for some reason wanted my name instead. After I added the file, this is what pops up when I do git commit -—amend:

output from git commit --amend

As you might be able to tell, I could also edit my commit message here! I also use amend if I have made a typo in a commit message or if I just want to expand on my initial, too short message. After amending (or rebasing), you will have to do a git push -f or a “force push”. Why? Because you are effectively rewriting git history!

git push -f

IMPORTANT NOTE if you are working on the same branch as someone else, be careful about force pushing. Consider using git push —-force-with-lease instead. And always make sure to let your buddy know that you are doing this.

That’s pretty much it! It might seem like a lot, but it actually gets pretty quick pretty fast as muscle memory kicks in. If you are interested in some shortcuts, here’s an example of what my .gitconfig sometimes looks like.

What’s your git workflow? Is there something you think I should change? Let me know!

Building a Donut Clone

I love Donut. In the past, it has done a great job of connecting me with coworkers or with new people large networking Slack. However, when I went to go add it to a new Slack that I started, I noticed that it will only pair up to 24 users per round for free. The group I run has 175 people in our #coffee-buddies channel. How much would that cost me? Maybe it’s not too much… OH $399/month??? I can build something that does a good enough job. So I built Slack Pairs.

Slack Pairs is a super basic Rails app that just needs free-level hosting on a platform like Heroku. The most challenging part of the setup is actually setting up the new Slack app and making sure it’s paired correctly. The easiest way to do this is to create a new channel in your slack instance, add one other person, and then run the task. If it sends you both a message, it’s set up correctly! Then you just change the channel id to the correct one and you are off to the races.

I would love to make this app more extensible and not require a fork or code modifications. I think that addition would be relatively simple, I just haven’t had time. I’m open to submissions if you have any cool ideas to improve it!

Autofixing Variable Case In PHP

I’m currently working on a PHP project that had a mix of camelCase and snake_case for variables and methods. We had recently started using PHP-CS-Fixer on the project and, unfortunately, there was not an existing rule to make this kind of change. So I decided to write a variable case fixer myself! Now: this is inherently risky. Instance variables in PHP are called using $this->variableName, which is really similar to how you call a function. Those could also be defined above the constructor like private $variableName and that would be fixed with a fixer like this, but any call site would not. So there’s some of the risk 😅. There are also predefined variables in PHP that we would not want to update. Ok, let’s get started!

Since I was using an existing project, I did not have to worry about getting each file and was able to trust PHP-CS-Fixer to parse each file and get me the tokens. The hardest part of this was actually figuring out how to pick out the tokens. So all this does is check to see if the token (smallest block of code) is either of the two variable types and not in the list of predefined variables.

foreach ($tokens as $index => $token) {
  if ((T_VARIABLE === $token->getId()) || (T_STRING_VARNAME === $token->getId())) {
    if (in_array($token->getContent(), $predefinedVariables)) {
      continue;
    }
    $tokens[$index] = new Token([$token->getId(), $this->updateVariableCasing($token->getContent())]);
  }
}

That is actually the bulk of it! updateVariableCasing just takes the configuration and then calls whatever function we need (ie camelCase if configuration['case'] is equal to camel_case. The functions to change case were found somewhere on StackOverflow. Overall, this works very well! The only places we ran into problems were where private variables were defined at the top, converted there, but then not converted when called in the code (as $this->variable_name). Something to keep in mind if you decide to implement something like this in your project.

I did put up a PR to add this rule to PHP-CS-Fixer, but I think they were reluctant to add it since it’s not safe and I don’t have a ton of extra time to keep trying to get it in.

When You Want A Bit More Rainbow In Your VSCode

I decided to give VSCode a chance again and decided, hey, if I'm setting up an editor from scratch, let's make it fun! I searched around and found the following extensions:

The colors they each defaulted to were... fine. But I needed ✨rainbow✨. So here are my settings:

End result is this for Bracket Pair Colorizer and Indent Rainbow (Rainbow Tags looks very similar):

 
Screenshot 2020-05-19 13.43.41.png
 

And this is what Rainbow CSV looks like:

Screenshot 2020-05-19 13.47.38.png

I did try Rainbow String, which was pretty cool! But it would sometimes rainbowize more than just strings and then I couldn't take advantage of the syntax highlighting. Overall, I can't recommend that one, even though it is pretty fabulous.

Important Code: Exporting Slack Emojis

What is the most important thing in your life? If you say Slack emojis, then you maybe have a misplaced sense of importance, but also, I understand. One of my current slacks has over 4,000 emojis. I wanted to pull them all down so I could add the ones that aren’t inside jokes to another slack… but how? There are a number of JS scripts out there that say that they will do this but I think Slack has since updated the JSON that they send so those didn’t work anymore. Being a rubyist, I wrote a parser for that JSON to export all the emojis. Downside: I still had to download all the JSON files. If you are more ambitious than me, I’m sure there is a way to do that via JavaScript fairly easily.

  1. Go to https://your-slack.slack.com/customize/emoji

  2. Open up developer tools then the network tab.

  3. Filter by XHR or just search for emoji.adminList (might have to reload the page).

screenshot-of-emoji-file.png

4. Copy and paste into a file called emoji#{number}.json with #{number} being the file number.

5. Keep scrolling down and keep copying and pasting and creating files.

6. Download the script into the same directory

7. Run script like this: ruby download_emojis.rb NUMBER_OF_FILES_CREATED Note: NUMBER_OF_FILES_CREATED should be replaced with however many files you created. It defaults to 10.

8. The files will be created in an emojis folder with the name of the emoji as the file name.

Learning Rust with a Java Background

Last year, I volunteered with TEALS, working with a local teacher once a month who was teaching the AP CS class. There was some extra time at the end of the year, so my teacher requested that I put together some materials to teach the kids something new. Since I was teaching myself Rust at the time, I decided to write a guide specifically aimed at high school students who have learned some Java but are now interested in Rust. I was heavily inspired by the Rust Book, but tried to simplify it so you could make it through in about one and a half hours. I’d love feedback on it and I hope someone finds it useful.

Rust Tutorial for AP CS (Java) Students

Use the JIRA API to Post Tickets to JIRA

A while ago, I built this super basic Sinatra app to post tickets to JIRA. Here’s the use case: you have non-technical people who are part of your company/team that need to be able to add bugs to JIRA. However, they aren’t putting the right information into the ticket. Here comes this super basic app. To get it running, you just need to update .env with your JIRA username, password, and project key. However, I would recommend changing it to use OAuth. Right now, the form is very simple and, if you decide to use this, I would highly recommend you update it to ask for whatever information you want. Just don’t forget to update the JSON in sinatra_jira.rb! This application is completely open source - feel free to copy any of it for any reason, whole or partial. Let’s dig in a bit and do a quick overview of how Sinatra works.

To start off, the Gemfile is minimal. The biggest thing is that I’m using dotenv, a super useful gem that helps manage environment variables using .env files. Other than that, rubocop, sinatra, and we are using thin for the server.

The main file (sinatra-jira.rb) contains the routes and the actions. It’s basically a combination of a controller and routes file all in one. The initial get just displays the form and all the work happens in post. Even that is fairly simple though… we just take the field contents and put them in the form that the JIRA API wants.

The form is pretty simple too and really ugly. I would definitely recommend adding some styling and don’t be like me… internal users deserve nice looking apps too! Since the problem I was facing was that I wasn’t getting the right information, I made sure to put examples in the form to increase the chance that I would get the information that I need.

This is a SUPER basic response. Don’t miss that we are passing key to the response. That is the issue key which, depending on how much your end users use JIRA, might be useful to include.

Hope this was somewhat useful in some way. I’d love to see feedback too!

Cookie Authentication using Scalatra and JWTs

As part of my work with Arcadia, I've built a Rails application that added a cookie that contains a JWT (pronounced jot). Great! That was fairly simple. Then I had to go over to our Scala application and get it to accept the JWT as identification. Right now, we were keeping it pretty simple and we only care if it's valid. This post will cover what I think is the simplest way to do that, from start to finish. Or you can skip all that and just go look at the full gist.

We want to start off with the JWT parsing. And before we add the code to actually do that, let's add some tests! I decided to use the JWT Scala library and, in particular, jwt-core. It had, in my opinion, the most easy-to-understand documentation so I could indeed RTFM and get my work done. Since I didn't need to add encoding in the actual application (the tokens would be encoded in another application), I added a quick line to encode a token within the tests.

Now that I have my tests, let's add the actual code to decode the JWT! Thanks to JWT Scala, this is pretty simple! The real secret sauce is in this line: userTokenData = parse(decoded).extract[Token].data. That does a lot of heavy lifting! decoded is just a string and parse turns it into this Jvalue object thanks to json4s, but that object is a bit hard to work with. However, I can extract it out to my case class, Token, which is downright magical. If it doesn't include all the fields that I have in Token, it will produce an error. Perfect!

Next I need a reusable Authentication object. This wasn't too bad because I found out that HttpServletRequest has a method called getCookies which... returns the cookies. Excellent. I'm sure this looks weird as an Either, but in this case I really did want Some or None because I didn't care about returning the error to the actual user. I did want to log it though, hence the liberal use of println.

Last, but definitely not least, I need a servlet. Well... tests for the servlet, then the servlet 😛. This is where I actually ran into trouble because I wasn't sure how to pass cookies to the get request in a test. With some help from my boss, we found out that get takes a headers param and you can pass a cookie if it looks like this: headers = Map("Cookie" -> cookie_value). To be honest, it required a bit of trial and error and I'm still trying to figure out exactly what values are being passed.

Screen Shot 2018-05-02 at 11.33.45 AM.png

And finally... my servlet! Short and sweet.

RailsConf 2018 Recap

I went to RailsConf last week and it was an amazing experience. DHH's keynote reminded me why I love Rails. Eileen's keynote made me super pumped for Rails 6. And all the talks were a delightful reminder of why I love programming and why I love the Ruby community. Here are some deeper thoughts and notes, divided up by talk:

Note: I'll post links to talks that I reference as soon as they are up.

DHH's keynote

This talk really hit home for me since I was very recently battling with Play for 4 months. One of the things that I do really love about Rails is that I can focus on solving the problem I actually want to solve, not problems that have been solved before (like... authentication). And, while I do agree that junior developers and people just starting out should not have to know SQL, I do think that knowledge of SQL is still useful if you want to be a good Rails developer. Relying solely on ActiveRecord is a mistake.

Crash Course in RSpec: stubs and doubles and mocks -- oh my!

This workshop managed to be both good and not quite what I wanted. I had hoped by the title that there would be a big emphasis on stubbing, but it was more of a footnote. It was a good crash course though and if you don't have much prior RSpec experience, check out Nicole's tutorial.

Interviewer Skills

Jennifer Tu of Cohere gave an excellent workshop on interviewer skills that I have about 4 pages of notes from that I will try to sum up here. One of the first things she brought up was that a team should have specific goals in mind when interviewing:

  • What values does the team have?
  • What characteristics does the candidate have?
  • What actions does the candidate take in certain situations?
  • What makes someone successful on my team?

For each attribute that the interviewers want the candidate have, they should ask questions that dig into how a candidate behaves. For example, if your team values kind feedback, instead of asking "Do you give kind feedback?" or "Are you nice when responding to pull requests?", ask "Have you ever given feedback to someone whose code was not good? What did you do? Why?". If you value independent learning, ask:

  • How do you learn something new?
  • Do you have an example of a time when you ran into code you didn't understand?
  • Share a time when you had a problem dumped into your lap but you had no idea what to do.

Make sure to wrap a question in context to ensure the candidate fully understands what you are asking. For example, one of the attendees wanted independent thinkers and people who would question decisions. They were currently asking this question:

You get a user request to add a blue button. How do you add a blue button?

However, in the context of an interview, someone who would normally question a decision like that might resonable think that the interviewer just wants to know if they know how to add a button to a page in HTML. What they should ask is:

We get a lot of feature requests and they aren't always valid. What would you do if you got a feature request to add a blue button?

Allow interviewees to show the skill if you can. Theoretical scenarios often just end up only showing red flags. Play acting is the better option. For example, if you want to know if someone gives kind feedback, give them some bad code and have them review it. If you want to know how they handle conflict, play act with the two interviewers coming up with conflicting ideas and ask them how they would resolve it.

It is the job of the interviewer to give the candidate the opportunity to show off. Interrupt (politely) if needed. You will be doing them a favor! Here are some possible polite interruptions:

  • I like where you are going with this but....
  • I'm sorry to interrupt, but I'm really curious about...
  • This is interesting, but I really want to hear more about...

You should also be sure to set an agenda and share rubrics with other interviewers ahead of time.

Pairing: A Guide To Fruitful Collaboration

André Arko gave this talk on the best way to pair and, as someone who has paired incorrectly for a while, it was quite interesting. So the basis of pairing is two devs, one machine.

Discover & share this Ncis GIF with everyone you know. GIPHY is how you search, share, discover, and create GIFs.

I can't not use this gif even though pairing is not this.

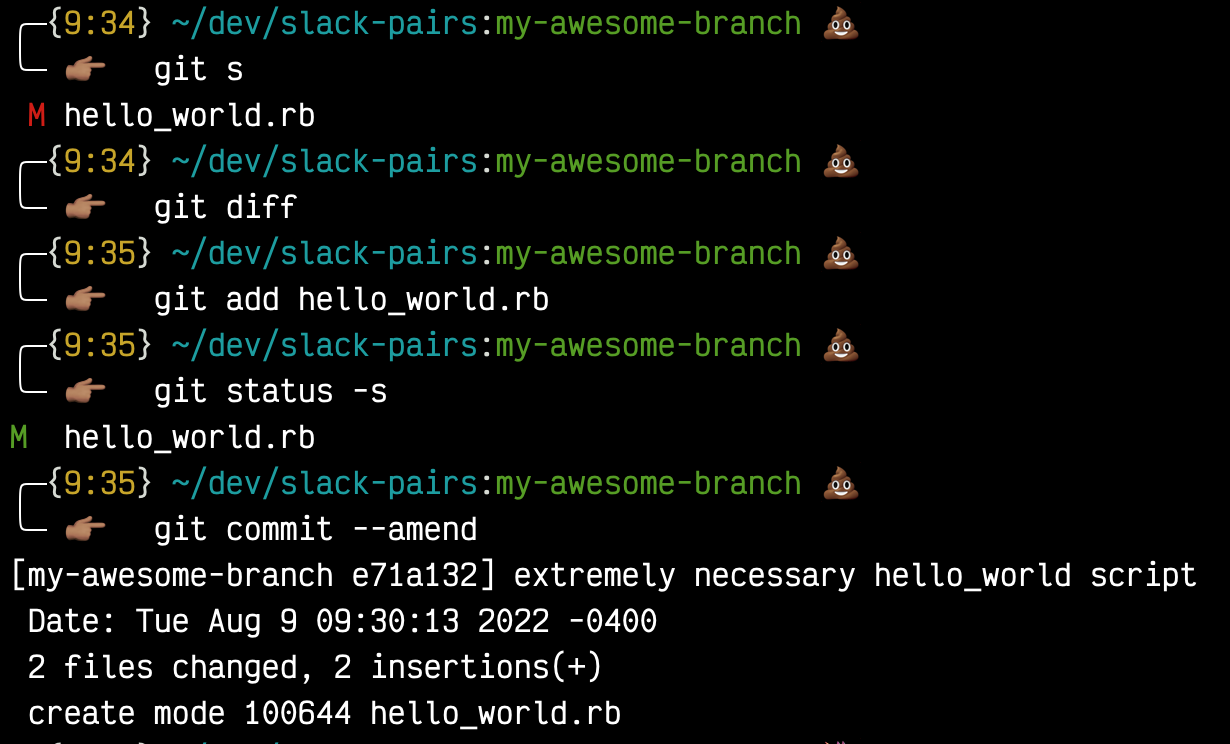
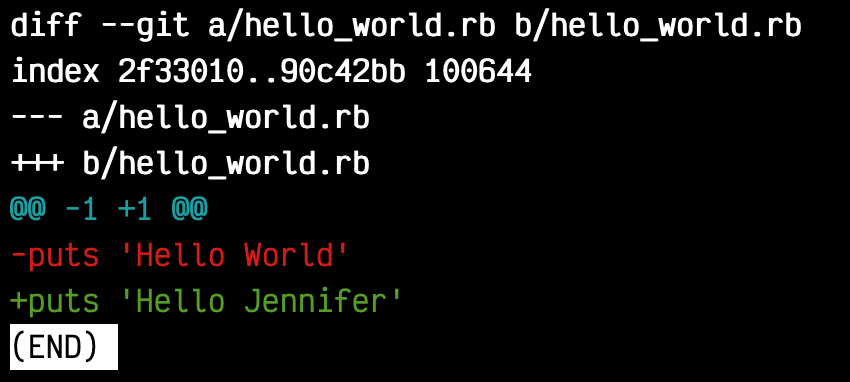
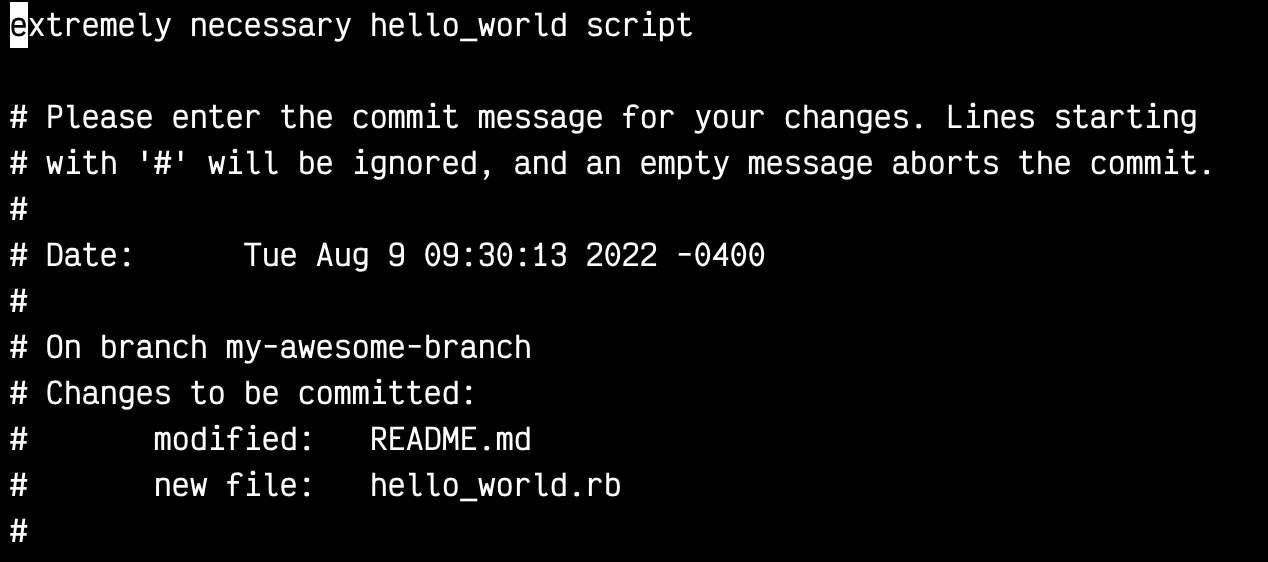
Anyway! You should be actively collaborating. The best way to think of pairing is to think of it as one little meeting. If done right, it should push you to be a better dev and away from bad habits. Above all, pairing needs trust. If you are condescending, that breaks the trust of your pair and makes you a lousy pair. One good way to pair is to have the driver write a test, codes until the test passes, writes a new test, then switch driver to the other person, who then repeats the process. Never say "let me do this quickly by myself." That is not pairing! Help the driver solve the problem and stay on the same page, so you both understand. There's a lot more to this talk, but I think you should watch it yourself 😃

The Practical Guide to Building An Apprenticeship

Megan Tiu built out the apprenticeship program at CallRail and so we get to learn from her experience! To start an apprenticeship program, you need:

  • plan (what are they going to do?)
  • cash (pay them!)
  • buy-in (convince the boss!)

You can sell it by noting that apprenticeship programs:

  • eliminate onboarding costs (you get to teach a newbie developer your way of doing things)
  • eliminate recruiting costs (why pay a recruiter $10K when you can give it to your apprentice)
  • easier to hire seniors (who love to mentor)

Here's what you want to know about your plan:

  • How long will the program be? (suggestion: 3-4 months)
  • How many apprentices do you want to have? (ensure there are enough seniors to mentor them)
  • What should they know prior to starting? (do you expect them to have a basic working knowledge of Rails?)
  • What should they learn?
  • How will they learn it? (through tickets, a big project, pairing, etc)

For hiring your apprentices, you want an application (basic questions to get to the heart of what they are about), a code challenge, and a final interview. If possible, do end-to-end anonymization until they get to the final interview. You also want to ensure you have a rubric prior to starting this process. After you hire them, try giving lessons on foundation concepts, then give them small changes (bugs/internal code). Then rotate them around to different teams, including customer facing product. And don't forget to set early expectations!

Eileen's keynote

Eileen Uchitelle totally pumped me up. She discussed the various ways she is looking to make Rails more scalable by default. One of the things that really stuck with me was when she mentioned how so many companies are doing these things individually... so why not make them part of the overall framework and share the knowledge!

The Code Free Developer Interview

Can you tell I am into interviewing? This was a talk by Pete Holiday, also from CallRail. Here are the problems with coding during interviews:

  • don't replicate real work
  • disadvantage people without free time (code challenges)
  • live coding is very stressful, even for experienced people
  • difficult to develop and maintain a good code challenge
  • many passive candidates won't do the takehome (I've done this before)

So what's the solution? The primary solution is to just talk to candidates.

  • Ask all the candidates a consistent set of questions
  • Define a rubric ahead of time
  • Write down thoughts right after the interview

That's it! But there's more. Here are three possible techniques for a code-free interview:

1. Dig into their experience. Let them direct you to what they feel is most important. Ask questions like:

  • What was your role in the project?
  • How does the feature work?
  • What's the worst technical debt? Why hasn't the team fixed it? How would you fix it?
  • Has it had any bugs/outages in production? What happened? How did the team fix it?

2. Have them do a code review. If you choose this, make sure you are not using production code (they will have no context), are actively reducing complexity, and include realistic bugs without making it a bug hunt. One good option is to have a completely contrived situation with a simple application and a pull request to that simple app. Another is to fork an open source repository and create a contrived PR. The pull request should include no detail in the commit message, unsquashed commits, non-idiomatic code, overly complex, bad variable names, and actual bugs.

3. Try doing a collaborative system design. For this, you want to hypothetically build a tool, platform, or a project. You don't want any code or pseudocode and you should be working with the candidate. The general idea should be easy to understand and either related to the skills you're hiring for or well known. This can be forever-long, so it needs to be timeboxed. Let the candidate lead and build complexity if it's needed. For example:

Let's say we want to build Facebook. Get rid of the boilerplate (we already have users) and then ask "How do we implement status updates?". Once they get there, we can go deeper and ask about privacy controls, then granular privacy controls, and past that potential performance problems.

I loved this talk because I think code-free developer interviews should be the norm and have also been advocating for it at companies that I have been at.

Plays Well With Others: Improv For Nerds

H. Wade Minter gave this workshop and I don't have any notes on it because it was an improv class. But! One of the big things I took from it was our last activity. To remove bias from ideas, we did the following:

  • each wrote down an idea on how to improve RailsConf for next year
  • exchanged that idea with another person
  • each paired up with someone else, compared ideas, and gave each idea a number of points (total points for the two ideas could not be higher than 7)
  • exchanged ideas with a different person
  • wash, rinse, repeat until we have compared ideas 5 times

At that point, we had seen about 10 different ideas (plus our own) and the best idea could have a total score of 35 with the worst having a score of 0. Our top idea had a score of about 26, with a good number being around 22. We had a couple of bad ideas in the double digits (I'm looking at you, bacon table). This definitely seems like a good practice for any organization with a decent number of people.

And that's it...

I did some more, but I don't have any notes! I also sat and watched my friend Sam Phippen pair for an hour and a half, so if you want to learn yourself some RSpec, watch here!

Introduction to Scala

I signed myself up to teach a Scala class through Girl Develop It Pittsburgh a few months ago and the class was supposed to be tomorrow. I say "supposed to" because we only had two people sign up, so we ended up canceling. However, I still made a presentation! And since I spent all that time on a presentation, I decided to make a set of screencasts to accompany that presentation. If you've ever been interested in trying out Scala, I hope this helps. If you need any help or want me to go through some other aspect of Scala, feel free to contact me.

Find the rest of the series here.

Getting Started With Play After Working In Rails

I've now been using Scala since November (so a little over 4 months) and Play since January (exactly two months today). When I first started writing this application, I was brand new to Scala. My boss recommended Scalatra since he had some experience. Since I had none, I agreed and got started. I learn by example, so I first went through and found some projects that I could look at and base my project off. With Rails, this was easy. The Rails Guides are FANTASTIC (I miss them so much). With Scalatra, this was much more challenging. I made some progress, but then I came to a screeching halt, which caused my boss to post to Reddit asking for suggestions. Lemme pull out some of my favorite comments:

On stack overflow there are around ~250 questions tagged with scalatra. There are around 15k play framework related questions. You're pretty much on your own if you go scalatra.
Akka HTTP you pretty much have to have a PhD to understand.
Play lacks a coherent, functional API, documentation for a good 60% of it, and completely lacks the composability and ease of use of alternative frameworks like http4s. Most of these problems with Play are due to poor planning, and being a Lightbend technology which is contorted to work with Akka(and akka-http), yet another poor Lightbend tech. It's a pervasive rot in the community, just like Akka.

GREEEAAAAAAATTTTT. Anyway, we decided to try Play It has documentation (the bar, it is low), at least one book written about it, and some decent templates. I migrated my project over to Play and got going. One of the major differences I noticed between Play and Rails is that Play is not very opinionated. In general, if you look at a Rails project, everything is generally in the same place. Pretty much everyone uses ActiveRecord and the RDMS you choose doesn't really matter. With pretty much any Rails project, you can initialize the database with rake db:create. This is not the case for Play. As far as I can tell, you have to create the database and then Play will run evolutions (migrations). The real problem I have is that there also is no standard. Slick is very popular, but we decided to use the newer kid in class, Quill. And I couldn't find a single example of someone using Play 2.6, Quill, and PostgreSQL. And Play 2.6 is a breaking release from Play 2.5. I found one template that used Play 2.5, Quill, and PostgreSQL, but it broke when I upgraded to Play 2.6. Right now I'm having some database connectivity issues, but I'm hoping to resolve those soon. As soon as I get the app working, I'm going to create a template so hopefully, others won't have as hard of a time as I have.

Overall, I sorta wish I was still working in Rails? I love the simplicity of Ruby and how easy Rails makes it to get a decent CRUD app up and running. It definitely would have only taken me one week to make this app in Rails and it's taken four months (and counting) in Scala.

The Fuck: The CLI App You Didn't Know You Were Missing

Everyone has days where they constantly mistype things and their muscle memory is failing them. Enter fuck. It's a CLI app that allows devs to type out what they are actually thinking to get the command that they actually want. If you mistype a command (like chiwn instead of chown), all you need to do is type fuck next and it will correct your command and then run it. Here's an example gif:

out.gif

Option and Either in Scala

I'm used to Ruby. In Ruby, you can use nil with abandon and just do something like if variable to check if it exists. Below is valid Ruby code (though forgive me if I'm now out of practice):

1
2
3
4
5
6
7
def displayUser(user)
  if user
    user.name
  else
    "No name"
  end
end

When I started on this project, I started treating Scala the same way. However, I found out that apparently you want to avoid using null in Scala. My first iteration prior to discovering this was the following:

1
2
3
4
5
6
7
def displayUser(user: User = null): String = {
  if(user != null) {
    return user.name
  } else {
    return "No name"
  }
}

This is not proper Scala. Unlike Ruby, Scala has Option. Option allows you to have Some or None. As you might expect, Some has a value, while None is the equivalent of null. Here's an example of how to do that same function properly:

 1
 2
 3
 4
 5
 6
 7
 8
 9
10
11
def displayUser(user: Option[User] = None): String = {
  if(user.isDefined) {
    return user.get.name
  } else {
    return "No name"
  }
}
// call it like this
user = User()
displayUser(Some[user]) //or
displayUser()

Either provides a similar function to Option but is better for returning error messages. The problem I was trying to solve was creating an organization user. For that to happen, there must be an organization and a user. Here's the initial way I did it, thinking as a rubyist:

 1
 2
 3
 4
 5
 6
 7
 8
 9
10
11
def validateUserAndOrgExist(email: String, orgId: Long): (Organization, User, Boolean, String) = {
  val user = usersService.findByEmail(email).head
  val organization = organizationsService.find(orgId).head
  if (user == null) {
    return (null, null, false, "User does not exist. Please create user first.")
  } else if (organization == null) {
    return (null, null, false, "Organization does not exist. Please create organization first.")
  } else {
    return (organization, user, true, "both exist")
  }
}

However, the better option (hehe) is to use Either in this case. So here's the better way to do this same function:

 1
 2
 3
 4
 5
 6
 7
 8
 9
10
11
12
13
14
15
16
17
18
19
20
21
22
trait ValidationError { val message: String}
case class IdentifierNotFound(message: String) extends ValidationError

def validateUserAndOrgExist(name: String, orgId: Long): Either[IdentifierNotFound, (Organization, User)] = {
  val user = usersService.findByEmail(name).headOption
  val organization = organizationsService.find(orgId).headOption
  if (user.isEmpty) {
    Left(IdentifierNotFound("User does not exist. Please create user first."))
  } else if (organization.isEmpty) {
    Left(IdentifierNotFound("Organization does not exist. Please create organization first."))
  } else {
    Right((organization.get, user.get))
  }
}
// then call it and use it like this:
val validationOfUserOrg = validateUserAndOrgExist("test", 123)
if(validationOfUserOrg.isRight){
  val (organization, user) = validationOfUserOrg.right.get
  print("User $user.name is in Organization $organization.id.")
} else {
  print(validationOfUserOrg.left.get.message)
}

And that's how you use Either and Option!

The TL;DR on tldr

There's a new package out that simplifies man pages and it's GREAT: tldr. Here's an example:

Screen Shot 2017-11-30 at 8.23.14 AM.png

tldr doesn't include every command, but it's growing with community support. Install it one of the following ways:

npm install -g tldr
brew install tldr
gem install tldrb
pip install tldr

There are many more ways to install, so if one of those doesn't work for you, go to the tldr github and find one that does.

Some Thoughts On That Sexist Memo

Yeah, just another hot take on that sexist Google memo. I could only read bits of it because it was just such garbage that I didn't want to waste my time on the whole thing. I also read a few other takes, but it overall seems like standard garbage and it doesn't really surprise me that a senior engineer at Google thinks this way. One of the bits that really stuck out to me was this:

We always ask why we don't see women in top leadership positions, but we never ask why we see so many men in these jobs. These positions often require long, stressful hours that may not be worth it if you want a balanced and fulfilling life.

This just sorta pissed me off because it's ignoring that most women don't opt for these jobs because sexism forces them to do almost all the household labor. Maybe it's also because, as a man, you can have what society deems as a "balanced" life while working long hours because your wife is taking care of the kids and a man isn't considered a bad dad if he's not super involved in the kid's life. This is total crap and bad for women and men that people think this way.

The real downside is that tech is the perfect industry to help even this out since it's pretty easy to work from home in most jobs. In one of my first dev jobs, one of the senior engineers that I worked with worked from home twice a week after his kid was born, alternating days with his wife, so she could go back to work too. I thought that was pretty cool and not a freedom most industries have! Maybe this is a faulty assumption that I'm making since I'm not a parent, but I'm assuming if you have kids you want to spend time with them?

Asking Questions

I've been thinking about this for a while, but keep not actually writing this post. One of the biggest mistakes I see juniors make is not to ask questions when needed for fear of looking like they don't know what they are doing. Granted, part of that is the way senior developers often react to questions. April Wensel wrote a fantastic article last August about the toxic tone that is prevalent in tech. So two points here:

  1. Senior devs should all read that article and consider more carefully how they talk to junior devs (or any other person for that matter). I'm not picking on anyone - I have definitely been guilty of this as well. However, being able to explain concepts plainly and empathetically shows your knowledge more than making someone feel dumb because they don't also have that knowledge.
  2. Junior devs need to make sure to timebox themselves. Give yourself a chance to do some googling, see if you can find an answer to your question on your own. However, after that first 30 minutes/hour, you should bring your question to someone else. Ideally, you have someone that you can approach who will answer your question compassionately. Make sure you give them all the information you have and the attempts you have already made. This will help avoid feeling like you are getting repetitive information.

Getting SQL Results That Are Distinct Across Two Columns

So this is a weird issue I just came across. Here's an example table schema:

mysql> describe queues;
+--------------+---------------+
| Field        | Type          |
+--------------+---------------+
| id           | int(11)       |
| customer_id  | mediumint(9)  |
| request_time | decimal(12,0) |
| item_id      | smallint(6)   |
+--------------+---------------+

mysql> select * from queues;
+------+--------------+--------------+--------+
| id   | customer_id | request_time | item_id |
+------+-------------+--------------+---------+
| 6829 |       15066 | 201704161118 |       1 |
| 6872 |       15066 | 201704161118 |       2 |
| 6875 |       15066 | 201704161118 |      26 |
| 6880 |       15066 | 201704161118 |       8 |
| 6881 |       15066 | 201704161118 |      15 |
| 6930 |       15077 | 201704161942 |       6 |
| 8683 |       14625 | 201704171412 |      10 |
+------+-------------+--------------+---------+

In my example, I might have the same customer requesting multiple items at the same time. I want to display all the items they have requested in the same line. That means I want to get a list of all the unique customers and request times combined. Yes, this isn't the *greatest* example because this table should probably be designed in a different way, but stick with me!

If I only want customer_id and request_time, that is pretty simple.

mysql> SELECT DISTINCT customer_id, request_time FROM queues;
+-------------+--------------+
| customer_id | request_time |
+-------------+--------------+
|       15066 | 201704161118 |
|       15077 | 201704161942 |
|       14625 | 201704171412 |
+-------------+--------------+

However, in my case, I need the queue id to do additional queries. That's where it gets just a smidge bit more complicated! Instead of just a simple DISTINCT, I've got to count the distinct records and then use HAVING to actually limit it.

mysql> SELECT *, 
COUNT(DISTINCT customer_id, request_time) as unique_orders 
FROM queues 
GROUP BY customer_id, request_time 
HAVING unique_orders >= 1;
+------+-------------+--------------+---------+
| id   | customer_id | request_time | item_id |
+------+-------------+--------------+---------+
| 6829 |       15066 | 201704161118 |       1 |
| 6930 |       15077 | 201704161942 |       6 |
| 8683 |       14625 | 201704171412 |      10 |
+------+-------------+--------------+---------+

Not too difficult, but I did go through a few different variations before getting to this result. I wanted it to work, but SELECT id, DISTINCT(customer_id, request_time) definitely does not!

Squashing Commits & Keeping Your History Clean

I'm a big fan of committing early and often. However, if you are anything like me, that means your commit history looks something like this:

added feature
fixed typo
oops another typo
added tests
fix failing test
fix another failing test
UGH TYPO

Fine for me alone, but not a great reference for the rest of the team when they try to figure out WTF I was doing a month or a year later. I've already written about how to rebase and squash commits before, so I won't cover that again. I do want to go a little more into why it's important to do so. Each commit message should reflect a distinct piece of work done. What I need to do now is rebase and change my commits to be more like this:

Added endpoint to return list of components
Added unit tests for component index endpoint

Now, if someone does a git blame, they can get the full context of what I was doing, not just a one character typo change. It's also worth expanding out your messaging and putting more context in the description. Every team has their own style and rules, but, personally, this is my normal git workflow and I'm a huge fan.