Building a Donut Clone

I love Donut. In the past, it has done a great job of connecting me with coworkers or with new people large networking Slack. However, when I went to go add it to a new Slack that I started, I noticed that it will only pair up to 24 users per round for free. The group I run has 175 people in our #coffee-buddies channel. How much would that cost me? Maybe it’s not too much… OH $399/month??? I can build something that does a good enough job. So I built Slack Pairs.

Slack Pairs is a super basic Rails app that just needs free-level hosting on a platform like Heroku. The most challenging part of the setup is actually setting up the new Slack app and making sure it’s paired correctly. The easiest way to do this is to create a new channel in your slack instance, add one other person, and then run the task. If it sends you both a message, it’s set up correctly! Then you just change the channel id to the correct one and you are off to the races.

I would love to make this app more extensible and not require a fork or code modifications. I think that addition would be relatively simple, I just haven’t had time. I’m open to submissions if you have any cool ideas to improve it!

Important Code: Exporting Slack Emojis

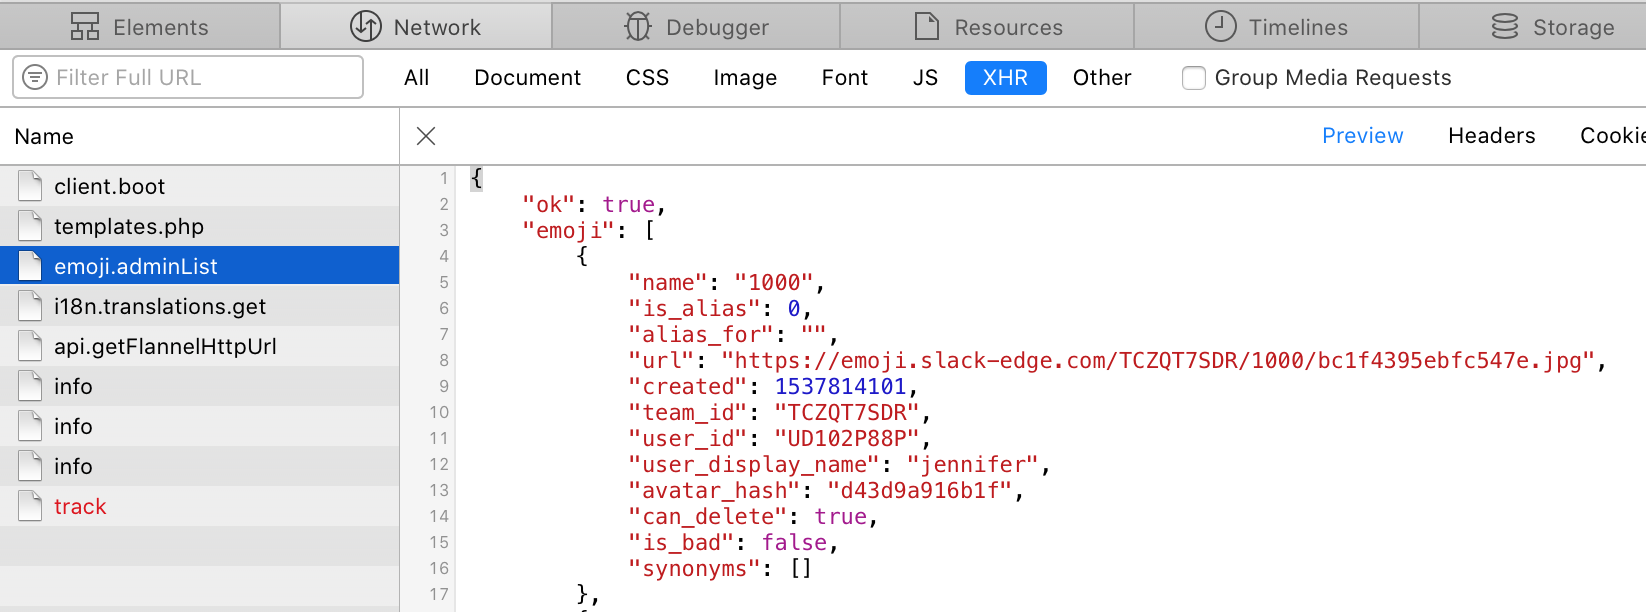
What is the most important thing in your life? If you say Slack emojis, then you maybe have a misplaced sense of importance, but also, I understand. One of my current slacks has over 4,000 emojis. I wanted to pull them all down so I could add the ones that aren’t inside jokes to another slack… but how? There are a number of JS scripts out there that say that they will do this but I think Slack has since updated the JSON that they send so those didn’t work anymore. Being a rubyist, I wrote a parser for that JSON to export all the emojis. Downside: I still had to download all the JSON files. If you are more ambitious than me, I’m sure there is a way to do that via JavaScript fairly easily.

  1. Go to https://your-slack.slack.com/customize/emoji

  2. Open up developer tools then the network tab.

  3. Filter by XHR or just search for emoji.adminList (might have to reload the page).

screenshot-of-emoji-file.png

4. Copy and paste into a file called emoji#{number}.json with #{number} being the file number.

5. Keep scrolling down and keep copying and pasting and creating files.

6. Download the script into the same directory

7. Run script like this: ruby download_emojis.rb NUMBER_OF_FILES_CREATED Note: NUMBER_OF_FILES_CREATED should be replaced with however many files you created. It defaults to 10.

8. The files will be created in an emojis folder with the name of the emoji as the file name.

Use the JIRA API to Post Tickets to JIRA

A while ago, I built this super basic Sinatra app to post tickets to JIRA. Here’s the use case: you have non-technical people who are part of your company/team that need to be able to add bugs to JIRA. However, they aren’t putting the right information into the ticket. Here comes this super basic app. To get it running, you just need to update .env with your JIRA username, password, and project key. However, I would recommend changing it to use OAuth. Right now, the form is very simple and, if you decide to use this, I would highly recommend you update it to ask for whatever information you want. Just don’t forget to update the JSON in sinatra_jira.rb! This application is completely open source - feel free to copy any of it for any reason, whole or partial. Let’s dig in a bit and do a quick overview of how Sinatra works.

To start off, the Gemfile is minimal. The biggest thing is that I’m using dotenv, a super useful gem that helps manage environment variables using .env files. Other than that, rubocop, sinatra, and we are using thin for the server.

The main file (sinatra-jira.rb) contains the routes and the actions. It’s basically a combination of a controller and routes file all in one. The initial get just displays the form and all the work happens in post. Even that is fairly simple though… we just take the field contents and put them in the form that the JIRA API wants.

The form is pretty simple too and really ugly. I would definitely recommend adding some styling and don’t be like me… internal users deserve nice looking apps too! Since the problem I was facing was that I wasn’t getting the right information, I made sure to put examples in the form to increase the chance that I would get the information that I need.

This is a SUPER basic response. Don’t miss that we are passing key to the response. That is the issue key which, depending on how much your end users use JIRA, might be useful to include.

Hope this was somewhat useful in some way. I’d love to see feedback too!

Getting Started With Play After Working In Rails

I've now been using Scala since November (so a little over 4 months) and Play since January (exactly two months today). When I first started writing this application, I was brand new to Scala. My boss recommended Scalatra since he had some experience. Since I had none, I agreed and got started. I learn by example, so I first went through and found some projects that I could look at and base my project off. With Rails, this was easy. The Rails Guides are FANTASTIC (I miss them so much). With Scalatra, this was much more challenging. I made some progress, but then I came to a screeching halt, which caused my boss to post to Reddit asking for suggestions. Lemme pull out some of my favorite comments:

On stack overflow there are around ~250 questions tagged with scalatra. There are around 15k play framework related questions. You're pretty much on your own if you go scalatra.
Akka HTTP you pretty much have to have a PhD to understand.
Play lacks a coherent, functional API, documentation for a good 60% of it, and completely lacks the composability and ease of use of alternative frameworks like http4s. Most of these problems with Play are due to poor planning, and being a Lightbend technology which is contorted to work with Akka(and akka-http), yet another poor Lightbend tech. It's a pervasive rot in the community, just like Akka.

GREEEAAAAAAATTTTT. Anyway, we decided to try Play It has documentation (the bar, it is low), at least one book written about it, and some decent templates. I migrated my project over to Play and got going. One of the major differences I noticed between Play and Rails is that Play is not very opinionated. In general, if you look at a Rails project, everything is generally in the same place. Pretty much everyone uses ActiveRecord and the RDMS you choose doesn't really matter. With pretty much any Rails project, you can initialize the database with rake db:create. This is not the case for Play. As far as I can tell, you have to create the database and then Play will run evolutions (migrations). The real problem I have is that there also is no standard. Slick is very popular, but we decided to use the newer kid in class, Quill. And I couldn't find a single example of someone using Play 2.6, Quill, and PostgreSQL. And Play 2.6 is a breaking release from Play 2.5. I found one template that used Play 2.5, Quill, and PostgreSQL, but it broke when I upgraded to Play 2.6. Right now I'm having some database connectivity issues, but I'm hoping to resolve those soon. As soon as I get the app working, I'm going to create a template so hopefully, others won't have as hard of a time as I have.

Overall, I sorta wish I was still working in Rails? I love the simplicity of Ruby and how easy Rails makes it to get a decent CRUD app up and running. It definitely would have only taken me one week to make this app in Rails and it's taken four months (and counting) in Scala.

Finding Unseen Unicode/ASCII Characters in Ruby

This morning, I thought I was losing my mind. I'm writing a little web app (mostly Angular) that makes API calls. I know the API works, but for some reason, the calls from my app to the API were getting a 500 error in response. I tailed the API logs to see an "ArgumentError: argument out of range". However, the only thing that happened on this line was the date parsing. I open up the Rails console and start debugging. First I type out the date that isn't working. It works. Then I copy and paste from my browser. Failure.

irb(main):027:0> "2017-02-13T13:12:51Z".to_time(:utc)
=> 2017-02-13 13:12:51 UTC
irb(main):028:0> "2017‑02‑13T13:12:51Z".to_time(:utc)
ArgumentError: argument out of range

As you can see above, they look IDENTICAL. One of my coworkers suggested that I check the ASCII value of each character. Lucky for me, Ruby makes this easy.

"2017‑02‑13T13:12:51Z".each_byte do |c|
  puts c
end
==>
50
48
49
55
226
128
145
48
50
226
128
145
49
51
84
49
51
58
49
50
58
53
49
90

If you look at a chart of ASCII characters and values, you can see that 127 is the end of the standard characters. My fifth character starts with 226. I know that the pattern of 226, 128, 145 repeats twice and in the same spot as the dash. Looking at a UTF-8 encoding table, I can see that set of characters represents the non-breaking hyphen, which is definitely breaking my API call. Mystery #1 of the morning? Solved.

Creating Awesome Documentation With Yard

This semester I have been taking a computer architecture class. Overall, it's been pretty fun because I was given three projects and allowed to do them in the language of my choice. I chose Ruby. I'm pretty proud of these projects, so I decided to post them all to Github. If you are interested in the actual code, you can find it here. While I was doing this, I realized I needed to up my average documentation game. I needed the grader, who didn't know Ruby, to be able to easily understand what I was doing and why I was doing it. For the first two projects, I just wrote up documentation in a relatively reasonable way, and they were able to read through the code comments to see how it worked.

That's when I found YARD. YARD uses markup (I used markdown) and tags to create delightful HTML docs. What were just comments in my code turned into this, with almost no extra effort. I'd heard of it before, but I hadn't had a project that was worth massive documentation. YARD made the documentation a delight. You create the necessary documentation by using markdown, so your README functions as the homepage for your docs. Then, within each class, you use tags to explain params, return values, and add notes and examples. Here is an example from my MIPSDisassembler project:

class MipsDisassembler
  # Creates a new instance of MipsDisassembler
  # @param array_of_instructions [Array] the array of string instructions
  # @param starting_address [String] starting address for instructions, should be a string hexadecimal value
  # @param is_hex [Boolean] true if array of instructions is in hex, false if in binary
  # @note Each object in array_of_instructions should be a string representation of either binary or hexadecimal number
  # @return [MipsDisassembler] a new MipsDisassembler object
  # @example Create an object
  #    mips = MipsDisassembler.new(["0x022DA822", "0x8EF30018", "0x12A70004"], "7A060", true)
  def initialize(array_of_instructions, starting_address, is_hex)
    @instructions = array_of_instructions
    @starting_address = starting_address
    @is_hex = is_hex
  end

  # Takes binary/hex instructions and starting address and return an array of MIPs instructions.
  # @note Determines if r-format or i-format and parses accordingly.
  # @return [Array] an array of MIPs instructions, human-readable
  # @example Disassemble instructions
  #    mips.disassemble => ["7A060 sub $21 $17 $13", "7a064 lw $19, 24 ($23)", "7a068 beq $7, $21, address 0x7a07c"]
  def disassemble
    disassemble_instructions(@instructions, @starting_address, @is_hex)
  end

  # write MIPs instructions to file
  # @note File "mips_results.txt" will be created in same directory as code
  # @return [void]
  def output_to_file
    File.open("mips_results.txt", "w") do |f|
      in_file = ""
      disassemble.each { |instruction| in_file << instruction + "\n" }
      f.write(in_file)
    end
  end
 end

You can see the result of this code here as well as the image below. The result is easy to navigate documentation that you can share with anyone. It also gives the ability to see the source code of each method inline, so you don't have to go far to see the actual code behind public methods that you would want to use. I know I'm a bit of a dork, but I seriously loved putting this documentation together and I'm hoping it made my code just a bit more accessible.

Fun with Binary & Hex in Ruby!

While I haven't written a coding post in three months, I swear I do code every day. Recently, I started taking night classes again. This semester, I'm taking Computer Architecture and Data Structures with Java. My first project in Computer Architecture was to build a MIPS disassembler. I decided to use Ruby, which ended up bringing up some unique issues, mostly because Ruby does not have a short variable type within it's Numeric class. In Java, the short type is a 16-bit signed two's complement integer. Ruby does not use primitive types because everything has to be an object. No short object == no short type. Also, while binary and hexadecimal numbers can be converted easily to decimal in Ruby, they are initially strings. What does this mean? It means that in addition to the other parts of the translate, I also had to convert from hex to binary and from binary to signed decimal. I'll probably share all of my code in the future, but for now, here's a walkthrough of those two functions:

Translating to binary

This was pretty simple. I just had to use sprintf and it immediately converted the hexadecimal numbers into binary. Only one hitch! I needed the leading zeros (if there were any), so I had to use rjust to make sure it was a 32 bit binary by padding it to the left with 0s.

# takes an array of hex and returns an array of binary
# (32bit, including leading zeros)
def translate_to_binary(array_of_hex)
  array_of_binary = []
  array_of_hex.each do |num|
    array_of_binary << sprintf("%b", num).rjust(32, '0')
  end
  array_of_binary
end

Converting to a signed integer

Since I couldn't just cast as a short, I had to use two's complement. With two's complement, I knew that if the integer version of the binary was greater than 2^15, then it was actually a negative number. Otherwise, it was correct as is.

def convert_to_signed_binary(binary)
  binary_int = binary.to_i(2)
  if binary_int >= 2**15
    return binary_int - 2**16
  else
    return binary_int
  end
end

Boom! I hope this helps someone else who might've had the same trouble I did at first. I'll go into the program in full after my whole class has actually submitted theirs. 😛

Parsing Logs With Ruby

I used to write log parsing scripts all the time with Python. That's basically how I got started programming. In the past few years, I've been working almost entirely on application development. Recently my boss wanted to get the unique number of active users in a day and the unique number of active users within the past 30 days, in addition to an actual list of each of those users with the number of requests that they made to the system.

There were a few issues. I had to keep in mind that there were sometimes anonymous requests, which I didn't want to add to my list since it didn't serve my purpose. I also noticed that there were some lines that didn't seem to contain a request at all, so I also had to account for that. Let's all hop on the regex party train!

Thanks to the magic of regex, I can very quickly tell whether or not a line is a request from an anonymous user and skip that line. I can also skip a line if there is no IP address at the beginning, which occurs when there are usually requests that cover multiple lines. I also have a regex to match the date format that our logs are using. If there's a date, then I grab it; if not, then I can skip that line too.

Now I'm left with only valid lines. SWEET! But what do I do with them? Since I need to keep track of both users by day (along with number of requests) and the numbers of unique users across the day and past 30 days, a hash will definitely be my best friend. All of the information in this case will go into a hash called all_days. Here is the basic format:

all_days = { date => { user_name => num_requests } }

Now that we have valid lines, we can start populating this hash. If the current date exists as a key, then we increase the given user's request count. If it doesn't, then we instantiate the user/request_count hash with a default value of zero. That's actually the bulk of the work. After that it's just a matter of counting and generating a list of users for the past 30 days, then uniquing that list.

If anyone has any comments on how I could make this better, I would welcome the feedback!

Complete script:

require 'date'
require 'fileutils'
au1 = 0
au30 = 0
EMPTYLINE = /- -/
IP_AT_START = /^(?:(?:25[0-5]|2[0-4][0-9]|[01]?[0-9][0-9]?)\.){3}(?:25[0-5]|2[0-4][0-9]|[01]?[0-9][0-9]?)/
DATE = /(3[01]|[12][0-9]|0[1-9])\/(Jan|Feb|Mar|Apr|May|Jun|Jul|Aug|Sep|Oct|Nov|Dec)\/[0-9]{4}/
month_users = []
all_days = {}
Dir.glob("/path/to/logs/access.log*") do |filename|
  File.foreach(filename) do |line|
    next if line.match(EMPTYLINE)
    next unless line.match(IP_AT_START)
    date_match = line.match(DATE)
    next unless date_match
    user_name = line.split(" ")[2]
    date = Date.parse date_match[0]
    if all_days[date]
      all_days[date][user_name] += 1
    else
      all_days[date] = Hash.new(0)
      all_days[date][user_name] = 1
    end
  end
end
au1 = all_days[Date.today].count
all_days.each do |date, day_users|
  month_users += day_users.keys if date >= Date.today - 30
end
au30 = month_users.uniq.count

Polymorphic Routes

I just started classes (working toward the CS certificate at BU Met) and my new big project at work is porting over a ton of code from Rails 2 to Rails 4, so I’m sure I’m about to have tons to write about. For today, here’s something I somehow just found out about: polymorphic routes in Rails.

What are polymorphic routes? Let’s say you want to have a partial that is used for quite a few different models. Every model you have has a show page for individual instances of that model and each show page has an edit link. So instead of creating a new page for each, the view you have reads in a generic @object and then you can use polymorphic routes to generate the path for the edit link! In this example, I’ll have the @object represent an instance of the Article class. Like so:

edit_polymorphic_path(@object)

results in:

edit_article_path(@object)

I’m pretty surprised I haven’t seen this yet, but now I’m glad that I have! This is pretty cool :D

Rails Forms - Basic Errors

This is going to be short because I’ve been crazy busy, but nothing really worth blogging about. Two things about forms in Rails:

1) You can’t nest them within a table. Let’s say you have this bit of code in your ERB:

<tr>
  <%= form_for TestClass.new do |f| %>
    <td>
      <%= f.text_field :test_field %>
    </td>
    <td>
      <%= f.submit 'Create' %>
    </td> 
  <% end %>
</tr>

What this results in is this:

<tr>
  <form action='/test_class'></form>
  <td>
    <input name='test_class[test_field]' type='text'>
  </td>
  <td>
    <input value='Create' type='submit'>
  </td>
</tr>

The form ends up closing before it actually ends, which means that it won’t actually submit properly. Bizarrely enough, sometimes it works… but it won’t work consistently. Lesson: don’t nest forms in tables. Haven’t tried it, but there’s a possibility that with HTML5, if you define the form outside of the <table&gth; element, then it will work.

2) You cannot instantiate a form in one div and then end it in another. This may seem obvious, but I see this a lot, especially with juniors. Example:

<div>
  <%= form_for TestClass.new do |f| %>
    <%= f.text_field :test_field %>
</div>
<div>
  <%= f.text_field :num_ponies %>
  <%= f.submit 'Create' %>
<% end %>
</div>

Results in this:

<div>
  <form action='/test_class'></form>
  <input name='test_class[test_field]' type='text'>
</div>
<div>
  <input name='test_class[num_ponies]' type='text'>
  <input value='Create' type='submit'>
</div>

No bueno. Never nest anything across multiple elements. HTML does not appreciate it.

Promo Codes in Rails

When I got tasked with adding promo codes in our Rails apps, the first thing that surprised me was how few posts there were on how to do it. So here I am to fill that gap.

First! We have to create a promo codes model:
class CreatePromoCodes< ActiveRecord::Migration
  def change
    create_table :promo_codes do |t|
      t.string :code
      t.decimal :amount
      t.text :purpose

      t.timestamps
    end
  end
end

And the model:
class PromoCode < ActiveRecord::Base
  # ...
  has_and_belongs_to_many :users
  # ...
end

Then we should add some fields to a user to reference promo codes. For our case, we want to know what promo codes they have used in the past, how much credit they have, and what user referred them.
class AddFieldsToUser < ActiveRecord::Migration
  def change
    add_column :users, :credits, :decimal, default: 0.0
    add_column :users, :referring_user_id, :integer
  end
end

And the updates to the user model:
class User < ActiveRecord::Base
  # ...
  belongs_to :referring_user, class_name: "User", foreign_key: "referring_user_id"
  has_and_belongs_to_many :promo_codes
  # ...
end

Plus one final migration to allow the has_and_belong_to_many to work:
class CreatePromoCodeUser < ActiveRecord::Migration
  def change
    create_table :promo_codes_users, id: false do |t|
      t.belongs_to :user, index: true
      t.belongs_to :promo_code, index: true
      t.timestamps
    end
  end
end

We also have a PromoCodesController. This isn't really doing anything unique, we just need it so we can allow admins to create promo codes.
class PromoCodesController < AdminController
  before_action :set_promo_code, only: [:update, :destroy]

  respond_to :html, only: [:index]
  respond_to :json, except: [:index]

  def index
    @promo_codes = PromoCode.all
    respond_with(@promo_codes)
  end

  def create
    @promo_code = PromoCode.new promo_code_params
    @promo_code.save
  end

  def update
    @promo_code.update(promo_code_params)
  end

  def destroy
    @promo_code.destroy
    render nothing: true, status: 204
  end

  private
    def set_promo_code
      @promo_code = PromoCode.find(params[:id])
    end

    def promo_code_params
      params.require(:promo_code).permit(:code, :amount, :active, :purpose)
    end
end

We then added a route that was specific to adding a promo code (within the user controller). We post to this route whenever a user adds a promo code:
def add_promo_code
  user = User.find(params[:user_id])
  # We decided the easiest way to do referring users
  # was to have codes that looked like this: MYCODE-265,
  # with 265 being the id of the referring user.
  # Not necessarily teh best solution for everyone!
    promo_code, referring_user = params[:promo_code].split('-')
    code = PromoCode.find_by_code(promo_code)
    if code
      if user.promo_codes.include?(promo_code)
        message = 'This promo code has already been used.'
      else
        user.promo_codes << code
        user.credits += code.amount
        if referring_user && user.referring_user_id.nil? && User.find_by_id(referring_user).present?
          user.referring_user_id = referring_user
        end
        if user.save
          message = 'Promo code successfully used!'
        else
          message = 'Error using promo code. Please try again or contact customer service.'
        end
      end
    else
      message = 'Not a valid promo code.'
    end
  respond_to do |format|
    format.js {  flash[:notice] = message }
  end
end

Then, whenever we are getting ready to charge a user, we add code like this:
if @user.credits > 0.0
  if @user.credits >= @price
    @meal_plan.price = 0.0
    @user.credits = @user.credits - @price
  else
    @meal_plan.price -= @user.credits
    @user.credits = 0.0
  end
end

What do referring users get? For us, they get a credit when the person they referred makes their first purchase:
def charge_user(user)
  if user.first_charge? && user.referring_user
    user.referring_user.credits += PromoCode.find_by_code(@user.promo_codes.first).amount
    user.referring_user.save
  end
end

There are a few other smaller things, but that was the bulk. If anyone has any feedback or something they would do differently, I'd love to see it in the comments!
More Favorite Gems

Here are another three of my favorite gems:

  1. chronic - Chronic makes me want to do a happy dance almost every time I use it. It basically take text and finds a way to parse it as a date (if possible). Ever wanted to grab ‘next tuesday’? Chronic can do that for you.
  2. pg_search - Hadn’t used it before, but then I had a very intense desire to rid my project of Solr (UGH THE WORST) and this gem did the trick. It makes it super easy to add full text search to your website if you have a postgres database.
  3. jbuilder - I’ve been trying to make any new service respond with JSON (ahem, JSON API) and jbuilder is the perfect tool for creating those responses. Definitely makes my life easier :D

Got any gems that you love?

Optimizing Your Rails App

NOTE: This is only a short post on one thing that I did that drastically reduced memory leaks and helped the performance of my app. if you want to go more in depth, I would recommend Alexander Dymo’s Ruby Performance Optimization.

About a month ago, I became the lead (and only dev) at a small startup. I emphasize small because that’s important to what comes later. Soon after I started, I was seeing a load of Heroku R14 errors... to the tune of 200+ per day. At first I just paid for one more dyno... then another dyno. When I got to seven, I realized that I needed to do something else and fast, because we couldn’t keep upping the dynos every time we got a little bit more traffic. I was also still seeing a TON of R14 errors. Again, I’ll emphasize small, because we really don’t have the large user base that would be actually causing us problems like this. We were just having massive memory leaks. So, time to dig into the code!

The main issue seemed to be a function that saved all recipes that a user could eat (i.e.: they weren’t allergic, didn’t contain any of their dislikes, etc). We were originally determining this by doing something like this:

recipes = Recipe.all
recipes.reject! do | recipe |
  recipe.contains_allergens?
end
recipes.reject! do | recipe |
  recipe.contains_dislikes?
end
# and so on...

So what's the better, safer way to do this? Just build a query! ActiveRecord only runs a query when you perform an action on it, so I could build the whole query and then have my only action be saving it to User.recipes. Example:

user_recipes = Recipe.joins(:ingredients)
user_recipes = user_recipes.where('ingredients.id not in (?)', allergies.map(&:id))
user_recipes = user_recipes.where('ingredients.id not in (?)', dislikes.map(&:id))
# and so on...

This is a gross simplification of the actual code. I know that seems like a silly trivial change, but, no joke, it sped our tests alone up by 4 minutes. Why? Because previously, when we were doing all the rejects, Ruby was saving a new variable in each iteration. Also, while I forgot to test my hypothesis, I'm pretty sure that since recipes was an attribute of User and we were assigning to a 'variable' recipes within the User model, that it was actually saving during each call... also super memory intensive.

So what can you do? If you have some code in your app that you think is slow, you can test it using this benchmark script. If you have that added to your lib directory, just call it like this:

Measure.run do
  Recipe.last #whatever code you want to test
end

The output will look like this:
{"2.2.2":{"gc":"enabled","time":0.04,"gc_count":0,"memory":"0M"}}

To translate:
{ruby-version: {"gc": are_garbage_collectors_enabled?, "time": time_it_took_to_run, "gc_count": total_num_of_garbage_collectors, "memory": amount_of_memory_used }}

Nested loops

Is it possible to do nested loops? Absolutely! Should you seriously reconsider your code and make sure there’s not another way to do it if you are thinking of using nested loops? ABSOLUTELY! Sometimes you have no choice… but more often, you just need to sit back and think about a better way to do what you want. Here’s a bit of an example:

I work at a nutrition company. We have meal plans, meal plans have recipes, recipes have ingredient measurements, and ingredient measurements have ingredients. In one part of the app, we were trying to consolidate all the ingredients in a meal plan and their measurements. Originally, that involved something like this:

  1. Get all the recipes
  2. Get all the ingredient measurements in that recipe
  3. Get all the ingredients
  4. For each ingredient, get all the ingredient measurements, then loop through those and consolidate

Easier and less memory-intensive way of doing this:

  1. Get all the recipes
  2. Get all the ingredient measurements in that recipe
  3. Loop through those once and tally them up using a hash, so your end result looks like this:
    {'1': [[1, 'cup'], [2, 'ounces']]}
    

Favorite Gems That You Should Absolutely Be Using

  1. Annotate Models
    I didn’t realize how much I loved Annotate Models until I moved to a project where we didn’t have it. Annotate Models basically adds the schema to the bottom of the models and the factories. I LOVE IT. The amount of times I’ve been looking through a model and trying to remember what fields I actually have is immeasurable.
  2. Guard
    Guard can be a pain in the ass. Sometimes it runs all your tests when you don’t want them to be run. But damn if it doesn’t help when you are refactoring a ton of your app and sorta wondering which tests you broke (answer: all of them). I’ve been doing a lot of refactoring and basically wish I had added Guard to the project on Monday instead of Friday.
  3. Paloma
    Paloma is another one I didn’t realize I would miss until it was no longer in my project. All of a sudden, instead of having all my javascript in a particular place, it’s scattered throughout the app, who knows where. I’m adding Paloma to the app I’m working on right now because, dammit, I need this level of organization!

Misconceptions about and, or, &&, and ||

Everyone should read this wonderful post by Avdi Grimm about ‘and’ and ‘or’ operators in Ruby. IMHO they are underutilized, partly in thanks to style guides that say ‘NEVER USE THESE!!!’. You absolutely should use them when it is the right time and place. As Avdi mentions, they are wonderful control-flow operators, so don’t shy away!

SitePrism is awesome and you should use it

I mentioned SitePrism yesterday and so I wanted to go in a little more depth. From my example yesterday, I used an inventory show page and an inventory index page. I had a find_inventory method on inventory index and a displayed? method on inventory show. I actually reconsidered the displayed? method and so I’m going to show how to use SitePrism to validate that the page has loaded in a different way.

Let’s look at the InventoriesIndex SitePrism page:

module Inventories
  class InventoriesIndex < SitePrism::Page
    set_url '/inventories'
    set_url_matcher %r{/inventories}
    section :list, "#inventories-list" do
      elements :inventories, '.inventory'
      def selector_for_inventory(inventory)
        "#inventory_#{inventory.id.to_s}_row"
      end

      def find_inventory(inventory)
        find selector_for_inventory(inventory)
      end
    end
  end
end

This makes my tests much each to read. Instead of typing

find "#inventory_#{inv.id.to_s}_row"

in my test, it instead looks like:

find_inventory(inv)

SO MUCH PRETTIER!

Let’s look at how SitePrism can help our InventoryShow page:

module Inventories
  class InventoriesShow < SitePrism::Page
    set_url '/inventories/{id}'
    set_url_matcher %r{/inventories/\d+}
    
    section :inventory_info, '#inventory-information' do
      element :name, '.inventory-name'
    end
  end
end

With just that little bit, we can validate that the page loaded what we want:

expect(page.inventory_info.name.text).to include inv.name

Overall, so much nicer than having all the css/xpath selectors all over your RSpec tests. Check it out!

Integration Tests: Cucumber vs. RSpec

I’ve recently started writing integration tests in RSpec instead of Cucumber and I have been LOVING IT. It’s taken much less time and a lot less terrible code. Here is what I need for a test using Cucumber:

features/show_inventory.feature

Background:
    And I am signed in as a user
    And an inventory "I" exists

Scenario: I can view the inventory page from the inventory list page
    Given I am on the inventories page
    When I click on the inventory row for that inventory "I"
    Then I should be on inventory "I"'s page

features/inventory_steps.rb

Given %r{^I am signed in as an? #{capture_model}$} do |model_name|
  user = create_model model_name
  login_with(user.email, user.password)
  @current_user = user
end

When %r{^I click on the inventory row for #{capture_model}$} do |model_name|
  inventory = find_model model_name
  App.inventories_index.list.find_inventory(inventory).click
end

The steps that aren’t covered manually are covered using a tool called pickle. Pretty useful, but can also be sorta frustrating. We also use SitePrism for both styles of tests and if you aren’t using it, you should reconsider.

So what does an RSpec integration test look like? If I was covering the same simple problem, here’s what I would do:

spec/features/user_inventory_spec.rb

require 'rails_helper'

RSpec.feature 'load inventory as user', :js do
  let(:user) { create :user }
  before do
    3.times do
      create :inventory
    end
  end
  
  scenario 'select inventory and view the page' do
    Sessions::SessionsNew.sign_in user.email, 'my_test_pass'
    inventory = Inventory.first
    
    Inventories::InventoriesIndex.new.tap do |page|
      page.load
      page.list.find_inventory(inventory).click
    end
    
    Inventories::InventoriesShow.new.tap do |page|
      page.displayed?
    end
  end
end

And that’s it. I just have to have the SitePrism pages for Sessions::SessionsNew, Inventories::InventoriesIndex, and Inventories::InventoriesShow designed correctly as well. But those I will use multiple times in other tests, so after the inital setup, I save a lot of time. In this case, I had already set the pages up while we were using Cucumber, so I didn’t have to do anything new to start writing tests in RSpec.

TL;DR unless you have a PM that is actually writing your Cucumber tests, just do them in RSpec. You’ll save yourself many a headache.